Diy Metal Detector Circuit - Gold Detector Circuit What Is Gold Detector Circuit Diagram : Previously we have made a very simple metal detector without a microcontroller, now we are building the metal detector using arduino.in this project, we are going to use a coil and capacitor which will be responsible for the detection of.
Diy Metal Detector Circuit - Gold Detector Circuit What Is Gold Detector Circuit Diagram : Previously we have made a very simple metal detector without a microcontroller, now we are building the metal detector using arduino.in this project, we are going to use a coil and capacitor which will be responsible for the detection of.. Whenever it senses any metal object near to it activates the proximity sensor. In this project, we are going to build a simple metal detector circuit using a bc548 transistor. Use a glue stick, adhesive strip, or tape to fix the two. The lc circuit is the combination of an inductor and a capacitor in parallel. The is accomplished by closing the bipolar power transistor or mosfet that connects the coil with the power supply.
After that, you will set the sensor part of the metal detector. This is the simplest metal indicator venture the unit of inductance is henry and condition to evaluate the inductance is: These instruments function by sensing changes in magnetic waves caused by being in near proximity to a metallic object. Wrap the excess cable in spiral fashion along the length of the metal detector's shaft and secure with electrical tape. Radio and calculator metal detectors.
Simple Metal Detector Using Ca3140 Ic from circuits-diy.com When metallic material approaches the center of the inductor (the detector coil), it enters the magnetic field created by the inductor. This changes the magnetic permeability of the inductor's core, causing the inductance to change. It is possible to make either pinpointer or a full size metal detector based on this circuit. In the circuit there is an rlc circuit formed by 47k resistor, 2.2µf capacitor, and 150turn inductor. Once your radio is set, place the back of your calculator against the back of the radio. Now as mentioned earlier in previous section, a metal core inductor has a high inductance value over a air cored one. There are three main parts in the metal detector circuit: How to build a cheap, light, but sturdy metal detector straight shaft;
Metal detector circuit schematic use an oscilloscope to check that pin 2 of ic1 delivers sinusoidal signal with frequency about 75 khz.
Plug the rca cable from the search coil bracket to the metal detector housing rca jack. 3 meteres solid copper wire,220ohm and 1kohm resistor. Metall detecktor zu spitzenpreisen kostenlose lieferung möglich If the decay of the reflected pulse takes more than a few microseconds longer than normal, there is probably a metal object interfering with it. The discharge graph of the coil can be divided in three sections. A radio already has all these electric components connected together to form a circuit. Whenever it senses any metal object near to it activates the proximity sensor. The proximity sensor brights an led or makes a buzzer sound. This changes the magnetic permeability of the inductor's core, causing the inductance to change. There are three main parts in the metal detector circuit: These instruments function by sensing changes in magnetic waves caused by being in near proximity to a metallic object. See bottom of description for the gold, coins and treasure ebook. Wrap the excess cable in spiral fashion along the length of the metal detector's shaft and secure with electrical tape.
In the circuit there is an rlc circuit formed by 47k resistor, 2.2µf capacitor, and 150turn inductor. Once your radio is set, place the back of your calculator against the back of the radio. Its a simple design and just for experimenting,8 parts needed to make this simple metal detector.parts: The is accomplished by closing the bipolar power transistor or mosfet that connects the coil with the power supply. Radio and calculator metal detectors.
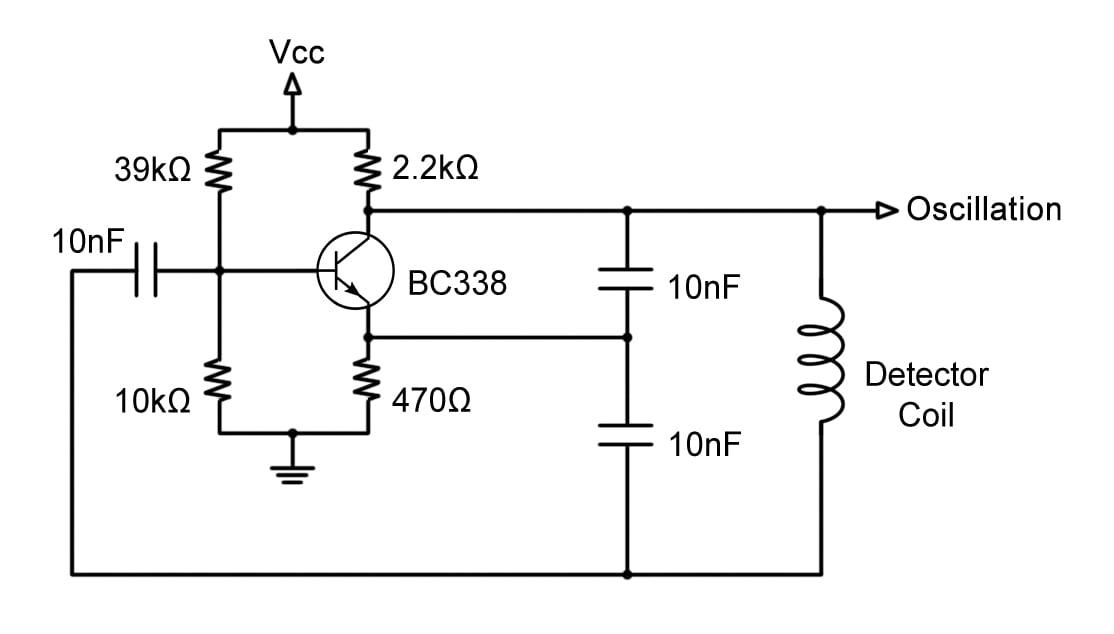
Simple Arduino Metal Detector 8 Steps With Pictures Instructables from content.instructables.com When the metal detector circuit is placed near to a metal object the inductance of its coil changes, and so do the frequency of oscillations. Then, adjust p2 in order to obtain 0 on the meter. Plug the rca cable from the search coil bracket to the metal detector housing rca jack. Connecting the metal detector electronics together Its a simple design and just for experimenting,8 parts needed to make this simple metal detector.parts: Once your radio is set, place the back of your calculator against the back of the radio. Wrap the excess cable in spiral fashion along the length of the metal detector's shaft and secure with electrical tape. How to build a surf pi 1.2 pulse induction metal detector from a diy kit.
Quate for all purposes in this metal detector circuit.
These instruments function by sensing changes in magnetic waves caused by being in near proximity to a metallic object. The proximity sensor brights an led or makes a buzzer sound. Plug the ceramic earphone into j2. A simple way is to use an instrument that has a magnet on it to make a metal detector. Now bring a metal such as scissors or pliers inside the bottle with the coil, and the pitch of the sound should change indicating you have a metal inside the bottle! The heart of this diy metal detector circuit is the cs209a ic. See bottom of description for the gold, coins and treasure ebook. The main components of a simple metal detector are lc oscillator, proximity sensor, and an led or a buzzer. Take a 9 volt battery and connect it to the battery clip. L = (μο * n2 * a) / l. A normal metal detector only uses one oscillator, but this diy will need to make use of two different oscillators to detect a change in the note when metal is detected. To build this diy metal detector, you need velleman k7102 kit, solder, a buzzer, a 9v battery, and some tools. By comparing it to the expected length, the circuit can determine if another magnetic field has caused the reflected pulse to take longer to decay.
This changes the magnetic permeability of the inductor's core, causing the inductance to change. Simple metal detector circuits are portable electronic devices for finding the presence of any metal within close range. The proximity sensor brights an led or makes a buzzer sound. The inductor of the above tank circuit forms the detector of the metal detector (a large coil of wire). Use a glue stick, adhesive strip, or tape to fix the two.
Build Your Own Metal Detector With An Arduino Projects from www.allaboutcircuits.com Diy metal detector coil housing build; By comparing it to the expected length, the circuit can determine if another magnetic field has caused the reflected pulse to take longer to decay. These instruments function by sensing changes in magnetic waves caused by being in near proximity to a metallic object. Once your radio is set, place the back of your calculator against the back of the radio. The coil and the capacitor c1, which are connected in parallel, will form the lc circuit. If the decay of the reflected pulse takes more than a few microseconds longer than normal, there is probably a metal object interfering with it. Metal detector is a security device which is used for detecting metals which can be harmful, at various places like airports, shopping malls, cinemas, etc. It is possible to make either pinpointer or a full size metal detector based on this circuit.
A normal metal detector only uses one oscillator, but this diy will need to make use of two different oscillators to detect a change in the note when metal is detected.
In this project, we are going to build a simple metal detector circuit using a bc548 transistor. These are two straightforward instruments to find and use. Metal detector circuit diagrams and projects note that all these links are external and we cannot provide support on the circuits or offer any guarantees to their accuracy. Diy metal detector coil housing build; Plug the rca cable from the search coil bracket to the metal detector housing rca jack. Previously we have made a very simple metal detector without a microcontroller, now we are building the metal detector using arduino.in this project, we are going to use a coil and capacitor which will be responsible for the detection of. The coil and the capacitor c1, which are connected in parallel, will form the lc circuit. This changes the magnetic permeability of the inductor's core, causing the inductance to change. The inductor of the above tank circuit forms the detector of the metal detector (a large coil of wire). When the metal detector circuit is placed near to a metal object the inductance of its coil changes, and so do the frequency of oscillations. L = (μο * n2 * a) / l. After that, you will set the sensor part of the metal detector. 3 meteres solid copper wire,220ohm and 1kohm resistor.
Whenever it senses any metal object near to it activates the proximity sensor diy metal detector. The inductor of the above tank circuit forms the detector of the metal detector (a large coil of wire).


0 Komentar